Everyone needs to have a good know-how of using Google Calendar. From easing the organizational activity to increasing the overall efficiency, every employee should know how to use the Google Calendar, make changes to it and eventually share it with their colleagues, respected departments or in the overall workplace.
This guide aims to make every employee aware of the uses and benefits of using Google Calendar. As everyone is provided with the Google Workspace from Gurzu, Calendar comes in handy to make planning projects or scheduling meetings a breeze. Even if you happen to be out of the office.
Elevate your efficiency by not missing your deadlines, or forget about your meetings, if you use Google Calendar profoundly.
Step 1:
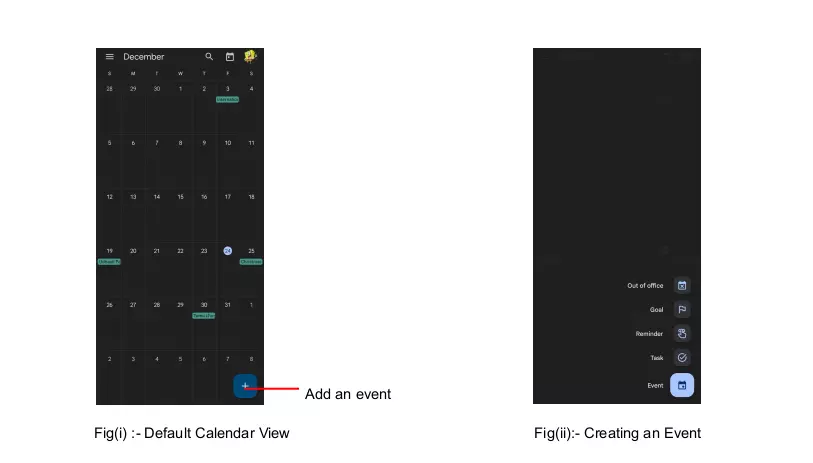
Open calendar.google.com. You will see the default screen as below.
The calendars/events you see depend on which account(s) you are logged into.
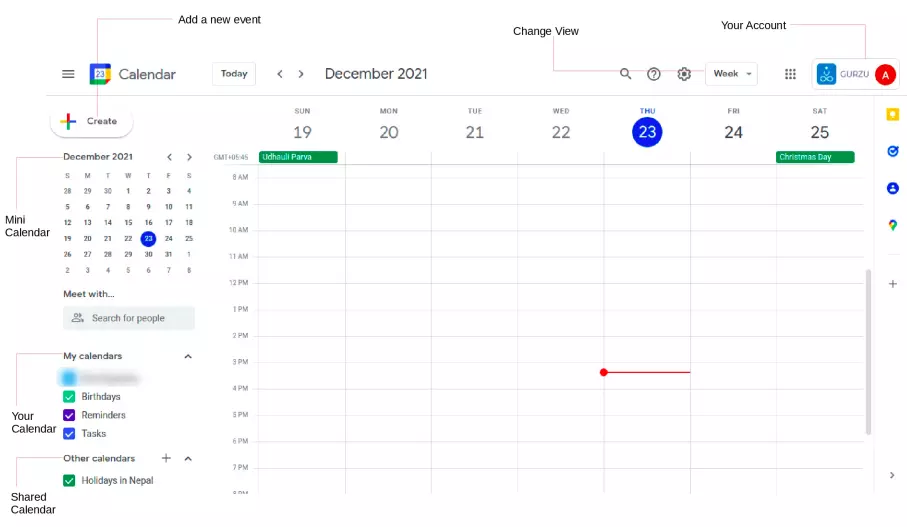
Fig :- Default Calendar View.
1.Change View :- The button at the top-right will change the scope of the current view, showing a single day or week, an entire month, and other view modes.
2.Mini Calendar:- Use the mini calendar to the left of the main calendar to view a specific date.
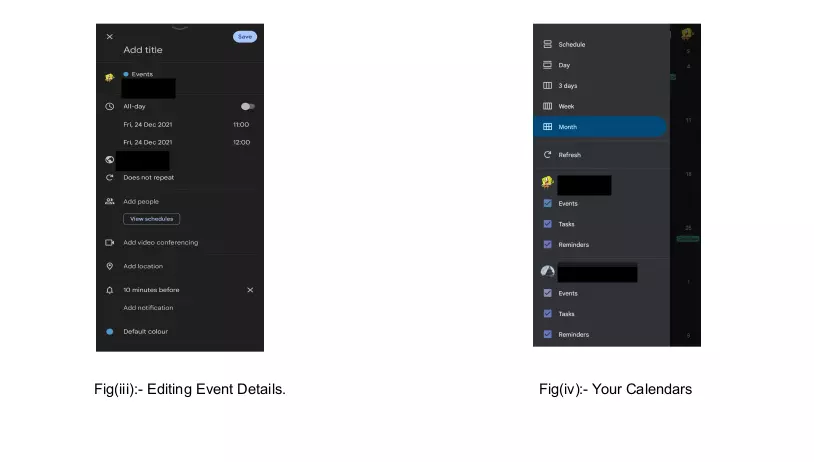
3.Your Calendar:- It will show you the dates, events, tasks which you have added to the calendar.
4.Shared Calendar:- This section shows you the dates, tasks etc which other people have shared with you.
Step 2:
Creating Events. Each item on the calendar is an event.
1.To create an event, click a blank space on the calendar. A small box will appear for you to enter basic information on the event.
2.Click the Save button to finish, or click the More Options button to enter more details.
3.The only information you need to enter is the title of the event and the time, but more information can be useful for anyone looking at the event.
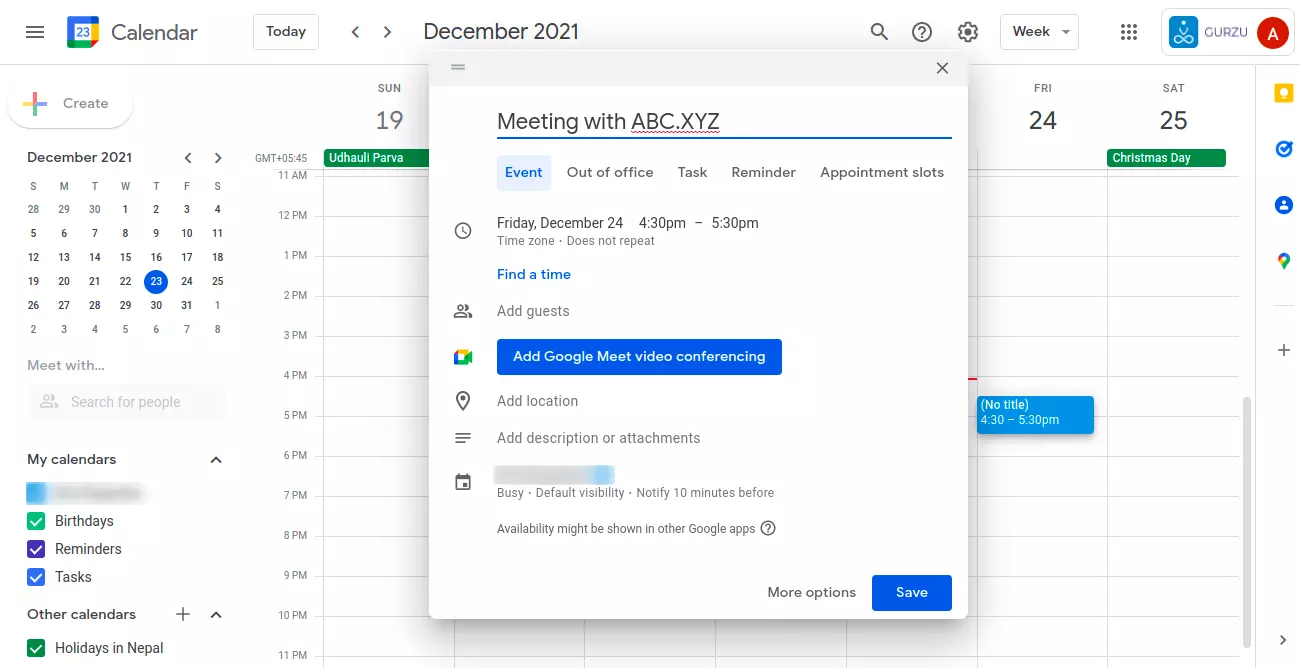
Fig:- Creating an Event.
In the event form, you can add notifications to remind you of the event before it starts. These reminders can be notifications in your browser or smartphone, or they can be automated emails. This can help you stay on schedule or give you time to plan travel.
You can click on “More Options” to fully utilize and customize the occurrence and behaviour of notifications of your events.
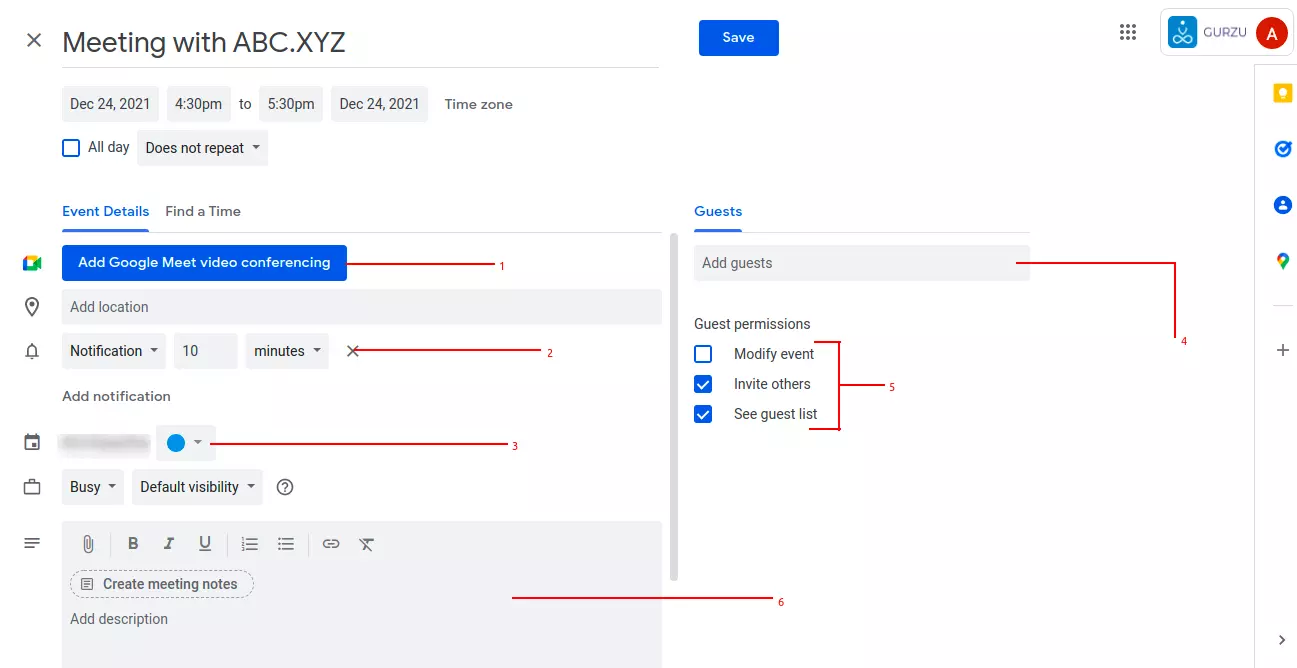
Fig:- Advanced Feature for Events.
- You can add Google Meet associated with your current logged-in account.
- Set time to get notification before the event.
- You can change the color of events in this calendar in your view, or you can hide it from the current view.
- You can add guests (meeting attendees or concerned people).
- You can specify certain permissions to the guests.
- You can provide notes (meeting agenda, or event description).
One of the most powerful features of Google Calendar is the ability to customize and share them. Move your mouse over a calendar name on the left (under “My Calendar”), then click the three dots icon beside it to open a menu for this calendar.
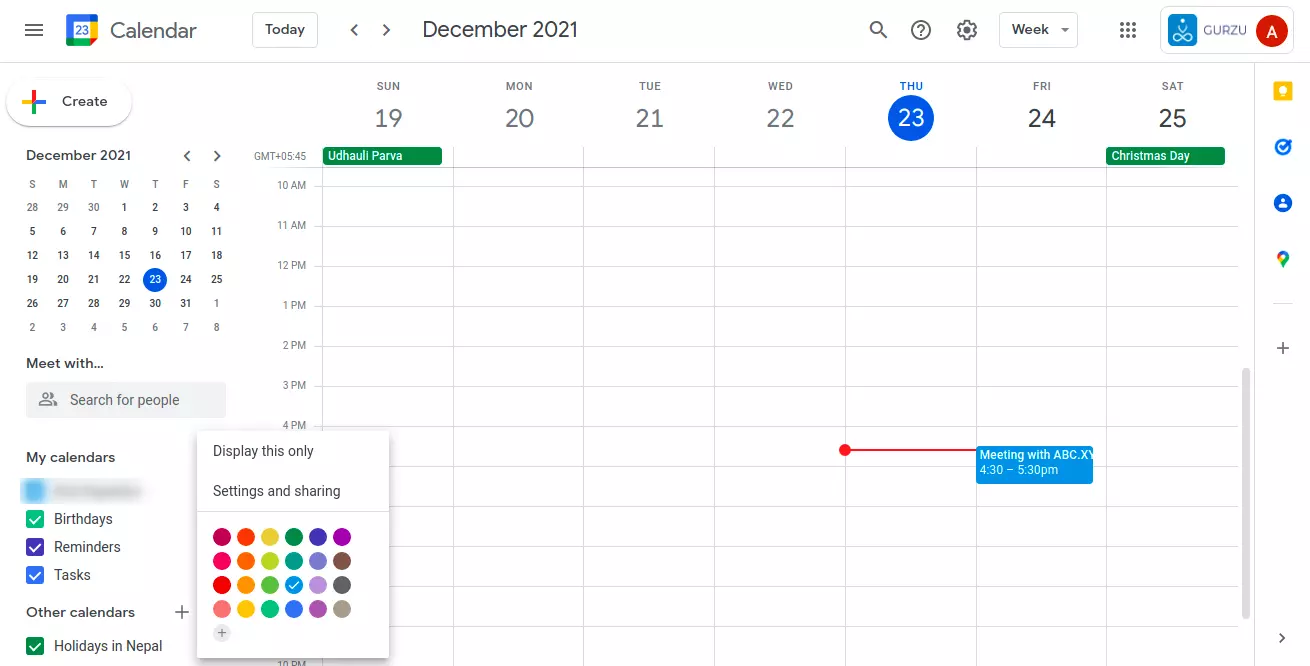
Fig:- Sharing Specific Calendar
You can change the color of events in this calendar in your view, or you can hide it from the current view.
You can share the entire calendar with others by clicking Settings and sharing. This will give you options similar to invitations for events, but it affects the entire calendar you are sharing. Shared calendars can be useful for coordinating many related events with a group of people.
Step 3:
Taking appointments.
You can search for specific people/colleagues from the “Search for people” option on the left side, and see their calendar if they have shared it with you or your organization. Every employee is requested to share their calendars, so that keeping up with meetings, deadlines, and time management can be performed easily.
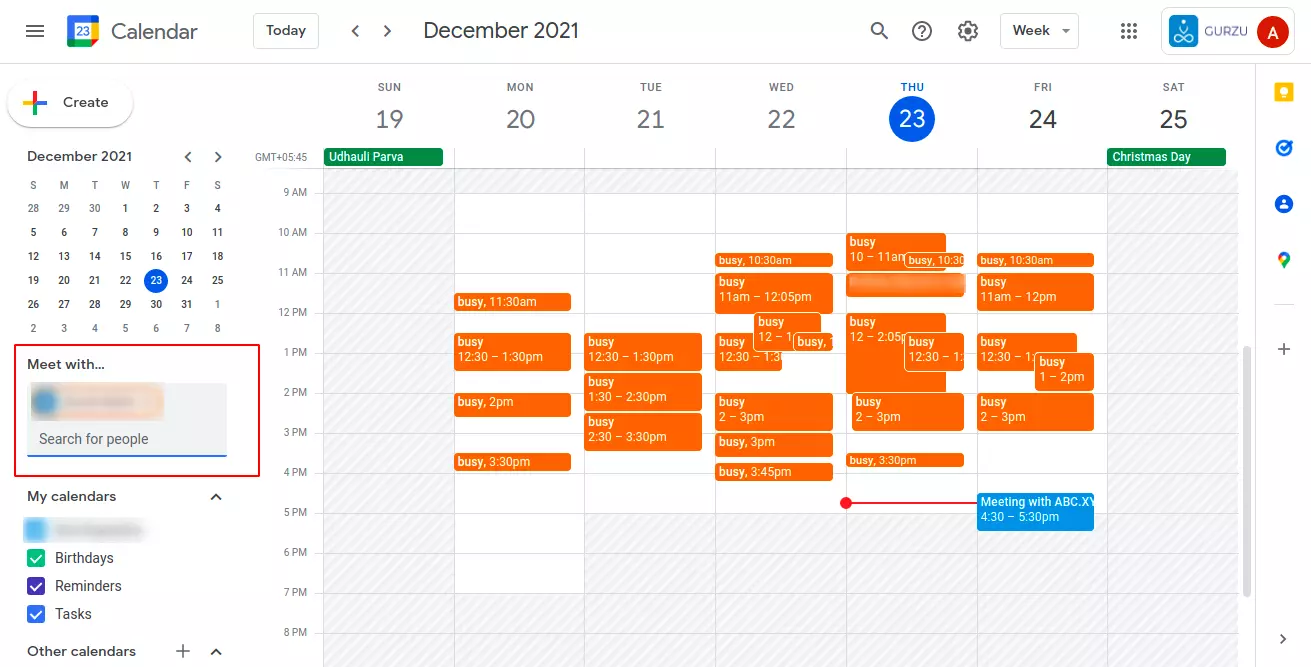
Fig 3:- Shared calendar of a colleague.
In the above figure, on the left side of the screen, you can see a red colored box. Here, you can search for specific people/colleagues within your contacts, or within your organizational domain. As you can see, the time slots are occupied by events for this specific person.
I can now schedule an appointment/meeting in his/her free time.
This will not create conflict in time management as the event won’t be scheduled in his/her occupied time.
Step 4:
Turn on working hours
To let people know you’re unavailable when they try to schedule a meeting with you, turn on working hours. You can only turn on working hours from a computer not the Google Calendar app.
- On your computer, open Google Calendar.
- In the top right, click Settings
- At the left, under “General,” click Working hours.
- In the “Working hours” section, click Enable working hours.
- Select the days you work.
- Select the times you work. You can split the hours you work based on when you’re available.
-
- To add more than one time period to your workday, next to a day of the week, click Add .
- To remove a time period, click Remove .
Tip: When you add work hours, the start time must be before the end time.
Step 5:
Show when you’re out of office
When you indicate that you’re out of office, your calendar automatically declines all meetings during that time.
- On your computer, open Google Calendar.
- At the top of your calendar, click the first date you’ll be out of the office.
- Click Out of office.
- Select the dates that you’ll be out of the office. You can also specify a time.
- Optional: To schedule out-of-office events that repeat, below the day and time you select, click the drop down menu next to “Does not repeat” > choose a frequency.
- Optional: Change your decline settings and edit your decline message.
- Click Save.
Google Calendar is accessible easily from smartphones as well.
- On Android it is available by default, whereas in Iphone/Ipad, it is to be manually downloaded from the App Store.
- After downloading, you have to set-it up from the same Google Account, which you have set-up from desktop/web if you want your events synchronized.
- The Steps for creating and sharing events are the same as above, slight change being the screen interface and optimized shortcuts.
- You can sync your calendar regardless of the device you use for Google Calendar.
- For Android, you can get the app from here.
- For Apple devices, you can get it from here.
- For Google calendar tips and extra features go here.
- For detailed information on using Google Calendar, you can visit this site.
- Follow our linkedin for more contents like this
About this article:
This article’s goal is to provide industry level practices for setting up meetings using Google Calendar. The writer portrays methods that has helped him smoothen out the calendar booking process within the organization.
Gurzu is a Ruby on Rails company based in Nepal. Here at Gurzu we transform ideas into world-class products. Our professional team is fluent in 3Rs (Ruby on Rails, React and React Native). We’re ready to design, build and develop something that your users will love. We love building web applications and do so with extreme passion and craftsmanship.
Our services include following. Product Design. Web application development. Mobile application development. Technology trainings. Infrastructure setup and monitoring. Engineers/Designers leasing.